

When summer is back... Let's take advantage of the sun and do a little bit of sun printing! It's fun and easy!
Quand les beaux jours reviennent ...Profitons de l'été pour faire de l'impression au soleil! C'est amusant et facile!

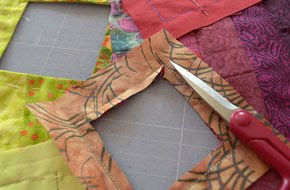
Take a plastic covered cardboard or a wood plank. Tape several pieces of different fabrics on its surface. (White or light colors work better).
Prenez un carton ou une planche recouverts de plastique. Collez-y, au moyen de ruban adhésif, plusieurs morceaux de tissus. (Le blanc ou les couleurs claires conviennent mieux).

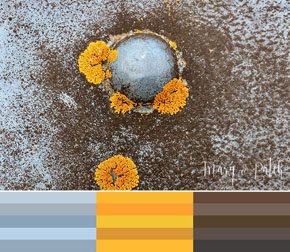
Gather some fresh or dried plants, as well as some small objects.
Rassemblez des plantes fraîches ou sèches, de même que de petits objets.

Sprayez les tissus avec de l'eau claire.

Peignez rapidement les tissus avec de la peinture textile, en gardant le tout bien humide.

Placez les plantes tout de suite, n'attendez pas! Laissez les tissus au soleil pour une ou deux heures.

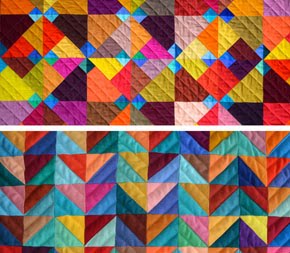
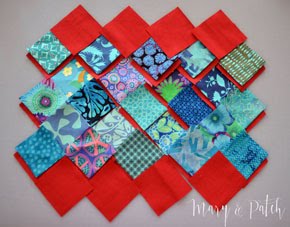
I've made a few textile cards with my sun prints,
J'ai fait des essais et je trouve que les tissus unis conviennent mieux. Je ne suis pas une spécialiste des peintures textiles, j'ai donc pris les peintures textiles que j'ai trouvé dans mes placards. Elles ont toutes bien marché. Je sais qu'il existe des peintures exprès pour l'impression au soleil dans le commerce mais je ne les ai jamais essayées.
J'ai fait des cartes textiles avec mes impressions soleil.


More on sun printing / Impression au soleil, encore: http://maryandpatch.blogspot.ch/2015/09/sun-printing-impression-au-soleil.html


Bonjour,
RépondreSupprimerGrand merci pour votre blog que j'adore. Setacolor (chez Pébéo) fonctionne très bien. Semer quelques grains - pas trop - de gros sel ajoute un petit plus...
Encore merci. Bel été !
gladys
Bonjour Gladys, merci pour le truc! La démo est assez basique, on peut bien sûr développer sans fin!
RépondreSupprimerI love this! The stitching gives the whole project an added dimension... well done!
RépondreSupprimerThanks tartankiwi! I love your blog! (and just finally discovered what SAHM meant! We in French don't use so many acronyms!)
RépondreSupprimerLoving these. Such a great idea. Do you use any old textile paint or something special? I thought it was going to be some kind of special photography fluid...! And the end result with all that detailed stitching is just brilliant.
RépondreSupprimerHi Jo, I use regular textile paint and also paints intended for silk (more fluid) Everything works, as far as I know!
RépondreSupprimerPS, the secret is to find leaves that are flat enough so they will stick to the wet fabric. Sometimes I roll them a bit between two sheets of plastic with my pastry roller. Avoid windy days as well!
(I love your fabric tags, so elegant!)
Gorgeous cards!
RépondreSupprimerThank you so much for sharing the process!
Thanks Rita for stopping by!
RépondreSupprimerwow, i LOVE what you have done with these! I'm going to try this at home!
RépondreSupprimerfollowing along now
xo em
oh dear, I cant find the follow button! Not sure how to do it. I am going to forward this blog to the textiles teacher at my school (i teach visual art), its such a great resource!
RépondreSupprimerThanks Emily! I don't have a follow button yet! I still have to work on details, all the blog world is still new to me, but I've been able to chat with so many nice people. I love your blog by the way. Your family pictures are a pure moment of grace! Good idea, you will cherish them later!
RépondreSupprimerGracias por el comentario en mi blog, me ha hecho mucha ilusión que una persona que hace quilts tan ceativos me escriba. Creo que tenemos algo en común y es "Pepa", es muy agradable estar con ella.
RépondreSupprimerTus reportajes y las fotos del Quilt en Sud son preciosos, al igual que tus trabajos.
Muchos Besos.
Hola Fina! Muchas gracias por el comentario amable!
RépondreSupprimerI feel like i am in the twilight zone, Maryline! Sun painting has been on my mind the past few days! Last summer i did a tutorial on sun painting (sending link privately) and I was thinking that it might be fun to order some green paint and red and use holly leaves and make a Christmas Stocking! To give it interest and stability, i was thinking I might try my hand at either quilting or embroidery with padding sandwiched between the sun painted fabric and the lining.
RépondreSupprimerAnd here you are - doing almost exactly that sans the stocking!
Honestly, sun painting is one of the most fun things I have done since starting my blogging life. I wish i could have joined in your fun!
Yours are fantastic of course - and making a quilt of them - what a brilliant idea! I think I will follow your lead to make a quilt but make something I can manage like a quilted table runner.
I am so glad you posted about your sun painting adventures!
Green and red stocking sounds great! I'm looking forward to see the result!
RépondreSupprimerElles sont belles tes cartes!!!
RépondreSupprimerC'est une magnifique idée!!!
Bon long week-end!
c'est vraiment très joli ! Amitiés
RépondreSupprimerThank you for sharing! I've been looking for sunprint paper (unsuccessfully; I'm going to have to order some) but I already have textile paint & my kids and I will have to give this a try.
RépondreSupprimerI love it! The results aren't as clear as cyanotype but I have the feeling this is a little bit cheaper.
RépondreSupprimerwow those are gorgeous!
RépondreSupprimerI'm trying to understand how this process works. is it that the wet paint adheres to the objects and so it leaves the fabric lighter where the object were?
do you know what part the sun plays in the process? (I'm wondering if it could be done without the sun)
thanks :-)
I'm really looking forward to trying this!
Very beautiful!
RépondreSupprimerThanks everyone for the comments!
RépondreSupprimerI think it works on two levels (correct me if I'm wrong!) The first one is that the sun fixes the color in the fabric, and it can't happen under the leaves. At the same time, the part of the fabric which under the sun dries, and by capillarity, it drains the humidity from under the leaves, and in doing this, the paint as well.
Anyway you all have fun experimenting!
Bonjour!
RépondreSupprimerMerci pour ce super tutoriel simple et magnifique à réaliser! Comme je l'ai adoré, j'ai choisi de le présenter sur mon site. Vous pouvez le voir à l'adresse suivante:
http://lescreateliers.com/Les_Createliers/Idees_Ideas/Entries/2011/6/16_Impression_au_soleilSun_printing.html
Si, pour n'importe quelle raison, vous ne désirez pas y figurer, laissez-le moi savoir et j'enlèverai mon entrée aussitôt!
Merci encore,
Marie-Eve (Les Créateliers)
Bonjour Marie-Eve, pas de problème, merci pour le lien!
RépondreSupprimerMerci Mary (for the explanation)!
RépondreSupprimerthat makes total sense.
I'm very excited to try this!
:-)
This is so beautiful! Thank you for sharing the tutorial.
RépondreSupprimerThanks Angela for stopping by!
RépondreSupprimerSuch a wonderful tutorial! We are going to give it a go today. Thank you.
RépondreSupprimerUn grand merci pour cette idée. La semaine prochaine sera idéale pour un essai :-) !! D'ailleurs, les cartes sont très belles!
RépondreSupprimerBonjour Barbara! Si vous avez des peintures Setacolor qui prennent la poussière dans une armoire, c'est le moment de se lancer! Bon succès!
RépondreSupprimerGreat small catalogue!! (Tried to find a name behind your "title", didn't succeed!) Send me pictures!!
RépondreSupprimerWhat fun! They turned out beautifully. I am curious about washability and how stable the images are to fading? Did you heat set them after the initial sun printing? I'll have to try this with the kids this summer.
RépondreSupprimeryes, I iron them after they are dry. I have no long term experience as far as fading is concerned, but I believe it depends from the paint you use. Setasilks are good quality paints.
RépondreSupprimerAbsolutely stunning! :)
RépondreSupprimerBonjour,
RépondreSupprimerJe suis enchantée de découvrir cette technique !
Faut-il fixer les couleurs ensuite, cela tient dans le temps ? Autrement dit, peut on se servir de ces carrés dans un quilt ?
Amitiés,
Hélène
Bonjour Hélène. Je n'ai pas une grande expérience sur la durée, mais si on utilise des teintures textiles, qu'on les fixe bien au fer, et qu'on n'expose pas le travail terminé trop longtemps au soleil direct, cela devrait marcher comme n'importe quel autre tissu.
RépondreSupprimerQuel beau blog que je viens de découvrir !
RépondreSupprimerFélicitations Maryline pour savoir donner une âme à tes créations.
Bravo pour l'expo de Neuchâtel.
Gilou
J'ai déjà fait cela il y a longtemps mais cela me donne envie de réessayer.Merci ++
RépondreSupprimerJ'espère réussir cette expérience très prochainement et je mettrai ce site en lien dans mon article. Merci pour ce tutoriel. Je vais sans doute employer des couleurs pour soie comme l'indique une des lectrices mais le principe fonctionne-t-il avec des peintures acryliques bien diluées par exemple ?
RépondreSupprimerBonjour Mimiblue! Rien de mieux que les essais. Tout dépend de la nature du tissu, du temps qu'il fait, de la peinture. L'acrylique devrait très bien marcher aussi!
RépondreSupprimerThese are beautiful!
RépondreSupprimerI would love it if you share this on my Sharing Creative Ideas link up this weekend!
~ joey ~
http://madebyjoey.blogspot.ca/search/label/from%20other%20bloggers
Merci pour cette super idée, je ne connaissais pas du tout cette technique, je suis sure que les enfants du centre de loisirs où je travaille vont adorer!
RépondreSupprimerThis is great. I am not a crafty person, But I think I could do this. As I read through the comments, I was inspired with the idea, that one could use cut out shapes in place of leaves. So one could make a series of, say, butterfly-themed pieces. The possibilities are endless. Thank you for your part in firing up the creative juices.
RépondreSupprimerI've just spent the day sun printing with a group of friends and we had such delicious fun. Easy and ideal to make in a group!
RépondreSupprimerCould I use dye instead of paint? Did you diluted the paint with water? Wat brand paint did you used?
RépondreSupprimerThank you for sharing
I've only experimented with textile paints. Fabric must be wet and paint quite fluid. All brands work.
RépondreSupprimerMerci pour tout ce que nous recevons par ce magnifique blog.
RépondreSupprimerThanks Maryline for sharing this tutorial! Right now, I am waiting for the paint to dry (my first attempt)!
RépondreSupprimerThis blog is genuinely helpful to pass on upgraded enlightening endeavors over web which is really examination. I found one productive instance of this truth through this blog. I will use such information now. custom made patches
RépondreSupprimerThanks for your blog! I tried this today, and it was so much fun. I soaked the textile in a bucket of water before painting them, and this worked as well. I was afraid I couldnt work fast enough on this day.
RépondreSupprimerNot all of the items stayed on the fabric because of the wind. Cant't wait for a second attempt soon.
Discover the art of sun printing on fabric! This creative technique involves using sunlight to imprint unique designs on textiles. Lay objects or stencils on the fabric, expose it to sunlight, and witness the magical effects. It's a simple and rewarding DIY craft that adds a personal touch to your fabric projects. "Your comment is like a burst of confetti, adding joy to our blog. Each word is a brushstroke on the canvas of conversation, creating a vibrant tapestry of ideas. We eagerly await your next insight, as your contributions light up our digital world. Thanks for being our comment superstar!" abogado de delitos sexuales de nj
RépondreSupprimerThis is a great article to read.prince william county criminal attorney
RépondreSupprimer